Showing posts with label Mary Kate. Show all posts

Tuesday, January 8, 2013

Kate's Christmas Dress: The Cottage Mama Party Dress Pattern Remix

Is everyone is getting all of their Christmas decorations packed up and put away?  You are probabaly better than me and alreay have it done!!   I wanted to take a second to share a few last Holiday pictures of Kate's Christmas dress this year.  I know everyone is ready to move on to Valentine's Day, but I am still tying up loose ends from the holiday season! 
 
Back that first week in December, I had a one day break from intense Open House sewing to knock out Kate's dress for Breakfast with Santa.  I had picked out a pattern by the Cottage Mama called the Party Dress.  If you have followed the blog since we began in June, you might remember that I also used only of Lindsey's beautiful patterns for Kate's birthday bonnet on her first birthday.  Her tutorials are top notch and always turn out beautiful results!   I modified the Party Dress pattern a bit to be what I needed for our Holiday version. 
 
 I had been hanging onto some really cool scrapbook trim roses that I thought would be a darling accent to a sash.  I was totally impractical with my fabric choice for this dress and used a beautiful iridescent,t dry-clean only, taffeta.  As usual, a coupon at Jo-Ann's helped me out, and I think the whole dress cost around $18.00. Grandmas vintage red button's with rhinestone centers were the perfect selection for this keepsake dress.   Instead of fabric closures for the buttons use some black bracelet-making elastic thread, purely for time-saving reasons!  I attached the cream rose trim to a long satin ribbon, as as you can see in the pic below, needed  a bit stronger tacking, because when Kate suffered from Santa Meltdown, all that thrashing about un-tacked a side of my sweet accent roses!  So for most of our pictures, her pretty dress looks a bit, ummm, shall we say, unkempt! We had just enough leftover cream rose trim that we were able to squeak out a cute headband as well. 
 
I really wanted a full little skirt and pretty tailored bodice.  It's a pet-peeve of mine if arm holes are too loose under the arms - I know...perfectionist!  So, I altered the pattern a bit to personalize the sizing to Kate's measurements, making two, uh hum...yes two, muslin practice bodices.  We also made a super simple tulle petti-coat out of cream tulle that helped hold the skirt out. 
  
And the final, and most important piece, was the precious little purse, compliments of Grandma Charla.  That last picture where she's taking her curly little head and walking out swinging her purse could have been captioned "I'm outta here Santa!"  She was not impressed with Santa...at all.
 
 
 If you are visiting us from Project Run and Play, welcome!  We are so glad you stopped by.  As always, I love to hear from all of you.  Good luck getting all those Christmas decorations down!

Happy Tuesday,
Jenny

Thursday, July 5, 2012

Happy Fourth of July and A String of Pearls


Happy Fourth of July everyone!  I hope you had an opportunity to relax with friends and family and enjoy celebrating!  We have had a busy last few days here!  Lots…and I mean LOTS, of fireworks!  The boys have been in hog-heaven shooting off their bag of 4th of July goodness.  In the evening we have been able to enjoy big “professional” displays at both our neighborhood and my parent’s.  I had lofty dreams of a darling little family photo with everyone sporting their red, white, and blue outfits…but trying to organize this resembled herding cats.  In reality, the boys couldn’t be pulled away from the explosives, and Mary Kate was less than cooperative posing with Dad.  Oh well, I tried! 

As far as sewing goes, not a ton getting accomplished here this week as the boys are out of summer school now and “nap-time” is looking a bit different!  I did manage to whip up Kate’s little stars and stripes top Monday, but it was such a quick task!  I am still working on a “top secret” project when the time permits.   I am so anxious to show you!  But on to today's main attraction....


I wanted to give you a little peek at a pretty sweet little birthday present my clever husband put together for Kate last month.  Poor Kate’s birthday got postponed twice, so somewhere in between postponement #2 and the real deal Greg decided to just go ahead and give Kate her gift from him and the boys.  I. Was. Blown. Away.  In a very special little box was a note from him and the boys and a beautiful pearl necklace.  The very cool thing about this necklace is that you can add a pearl for any special occasion that warrants a pearl!  He had done some research on the internet and discovered the idea, but could only find one jewelry company in Kansas City that carried them.   The woman that sold it to him explained that her three daughters each were given one by their grandmother for their first birthday, then grandma added to it each year.  By the time they got married they had a full string of pearls!  So the first three pearls on Kate's will all be the same size (you can choose different sizes for different dollar amounts J ).  These first three pearls will represent Greg and the boys so Kate will always remember that her three boys gave it to her.  And the note….ahhhhh.  Well, it talked about a lot of things I try not to think about just yet….birthdays, first dates, marriage, etc).  Dad really outdid himself on this first gift…in his own words "home run!"

Have a great Friday everyone!

Jenny

Thursday, June 28, 2012

1956 Bubble and Eyelet Apron


I am so excited to share this little outfit with you!  I found the pattern in the spring and ordered it off of ETSY… the other blogs I follow list vintage patterns that they stumble across in local thrift stores, but I never seem to be so lucky!  I love everything about the 1950’s style of clothing: the fitted waistline, shorter and fuller skirts (perfect for new walkers), attention to details…really, the patterns are just wonderful!  As I continue to learn new sewing techniques and hone in on “my style” I keep coming back to the patterns of this time period.  They make me feel like I am in another era inspired by the looks of Audrey Hepburn and Jackie-O…style icons!  So a really great night for me is flipping on Pandora to my Jimmy Durante station and sewing a 50’s pattern…instantly, I feel like I am back in time…watching my grandma, wearing an apron and pearls,  sew something for her little girls…perfection!  The past is such an inspiration for me!
                Kate got the most adorable little squeak shoes for her birthday.  Yes, they squeak every time she steps…and I think they are precious!  Ask my dad, after this weekend’s vacation and he might have a different version, but that’s beside the point.  The shoes are black with little white and yellow daisy-looking flowers on the toe…only problem was she didn’t have an outfit to match.  Sooooo…when I thought about what we could make to go with the shoes, this pattern immediately came to mind.  I knew black and white check gingham with a white eyelet skirt would just be perfection!  I have to say, I couldn’t be more pleased with the final design.  I love the large white bow and two deep pockets on the detachable skirt, perfect for holding the paci’s that we very much need to start weaning her off of!  The gingham bubble is so cute all by itself, and I can’t even tell you how much I love the weight of classic summer gingham!  Truly, I wish I had a bubble for meJ!  I also added a headband, black elastic with a gingham ruffle and black ribbon.  


                I think I am going to make another red version of the bubble to pair with the skirt for the Fourth of July.  The skirt is so versatile…it could be paired with many things other than the bubble and “work”!  I will list this item in the store this week.  It is a custom order, size 1.  Measurements: Chest 20 inches, Waist 19 ½ inches, hips 21 inches (Comparable in size to a GAP 12-18 month).  The bubble has elastic waistband and leg openings (please note: no snaps in crotch).   Please indicate which color of gingham (red, pink, black, blue).  Please allow two weeks for custom orders. 


Look for another ready-to-ship listing for a size 2, 1950’s pattern early next week!

I would love to know what you think!  Comments always wanted and welcome.


Jenny


Friday, June 15, 2012

Strawberry Yummies and my Scone Recipe

Such yummie strawberry treats were enjoyed at Mary Kate's first birthday party!  We started with strawberry scones.  I picked this recipe up when we were on vacation in Destin, FL one summer.  I make it all the time and it is one of my family's favorites!  See below for the recipe.
I also found several great recipes on pinterest that I added to my Strawberry First Birthday Party board.  The Strawberry Tea is officially my new "drink of summer"!  The Jack bread sticks and Strawberry Salad with Balsamic Lime Dressing were soooo easy!  We added a little seasoned chicken breast on top of our salad and they were the main entree.  Of course I knew salad wasn't going to be a huge hit with the two B's, so macaroni was also in order!


For the cupcakes and Kate's "mini-cake" I used a recipe I discovered on the blog I mentioned yesterday called  This Inspired Me. The recipe is  called Strawberry Dream Frosting...all I need to say here folks is THREE CUPS OF BUTTER...oh yes...a dream.  We added some sparkly white sugar. 
 For the little cake, I used a jumbo muffin tin and filled just three of the cups (I put water in the unfilled ones so that the pan wouldn't burn).  When they came out of the oven I sliced the "muffin tops" off, leaving three little mini-cake layers...I assembled these as you normally would a layer cake and....Viola!  Mini Cake.


Fresh strawberries
3 cups of self-rising flour
¼ cup fruit
½ cup sugar
1 stick of butter
½ cup of buttermilk
*      Note:  I use more buttermilk than the recipe calls for…I don’t really measure it…sorry!  I just add a little bit at a time until the consistency is that of slightly sticky dough.
Prepare the fruit by slicing and sprinkling with a little sugar. Set aside.
Combine flour and sugar.  Cut butter into flour and sugar mixture until it resembles a course meal.  Add buttermilk * see note above, then fruit.
Stir until all ingredients are moistened and form a soft ball.  Turn out on a generously floured surface and knead until it can be patted out ½ inch think.  Cut with a biscuit cutter.  Bake in a preheated oven at 400 degrees for 10 to 12 minutes.
 Glaze:
Strawberries
1 cup powdered sugar
A few drops of milk or whipping cream
Puree a small amount of strawberries.  Stir in the powdered sugar and a few drops of milk to make a glaze.  Adjust liquid to make a consistency for brushing top of scones with a pastry brush (I just spoon it on).  Brush tops of scones and watch the glaze disappear…or if you’re like me you put a lot of glaze on and can still very much see it as you sneak two of these little delights before calling the job “done”… :).

Thursday, June 7, 2012

The Knot Pillowcase Dress


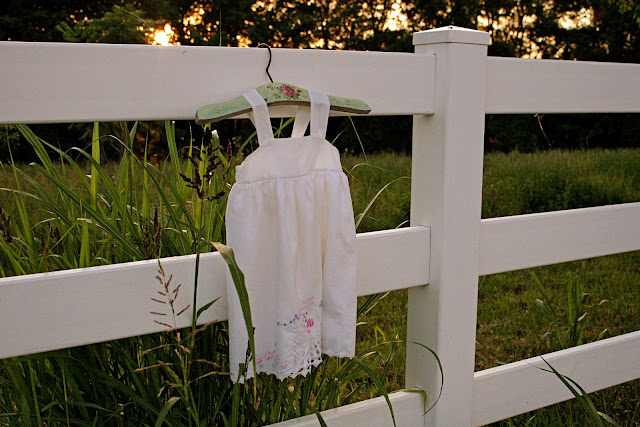
 I mentioned yesterday that today I would be sharing the Knot Pillowcase Dress. This is absolutely my most favorite thing I think I have made so far. When I finished it back in February, I knew it was "the dress" for one-year pictures. I am sure many of you have seen the pillowcase dresses that many have been making recently. I love them, but was looking for something more tailored to use with a special pillowcase that my mom had given me. I stumbled across a patten for a knot dress by Whimsy Couture and thought this would be a perfect way to join a pillowcase with a true dress pattern! I also wanted to incorporate a detail I had seen in a children's catalog where the ties were reversed to tie in the back with a large bow...love it! The pillowcase my mother gifted to me, originally a wedding gift 40 some years ago, had this beautiful hand stitching along the bottom of the pillow, and the fabric is just the finest, softest thing ever!!


  I envisioned Mary Kate in this finished little dress on the beach in Florida...but instead I bring you the golden fields of the Midwest :).  I doubled the skirt with and underskirt so that the lace "dress" on the doll at the bottom would have a backing up against it...the skirt was not too full...I was limited by the width of the pillowcase, but overall, I am so delighted with the finished product!  This was one of the "firsts" in adding to Mary Kate's hand-sewn collection.  Special thanks to our resident family photographer for all the beautiful pictures with Mary Kate in them...we had so much fun trying to get this feisty one-year-old to look elegant in this dress! 

Thanks for visiting today! 

Jenny