Showing posts with label tutorial. Show all posts

Wednesday, October 24, 2012

Guest Post by Gwen Hefner: The Baby Witch Hat

Well do I have a treat for you today...I am so excited to be hosting our first guest poster!   Gwen Hefner, extremely talented and always creative, brings us a darling tutorial for a lil' Witch's Hat.  And wait until you see her little cutie! 

Halloween is a week from today!!  Do you have your costume ready??

And without further ado....I bring you, The Baby Witch Hat...


I want to thank Jenny for giving me the chance to do a guest post.  Sharing my DIY’s with others is something I’ve wanted to do for a long time, and I appreciate her giving me the chance to get my feet wet.
 

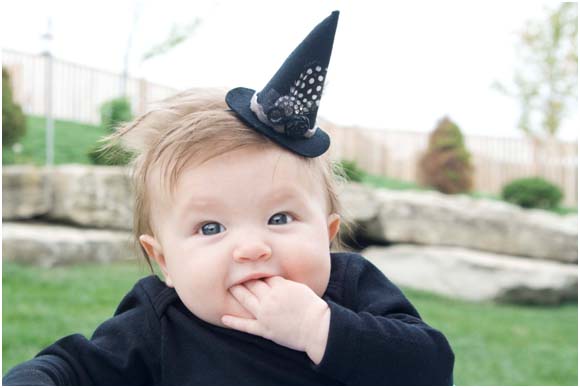
When my son turned 3 in September, he requested party hats and I knew I wanted to make something for my daughter, Milly, as well.  After sizing down the pattern I made for the bigger hats, I came up with this.
 

With Halloween fast approaching, and no luck finding a great costume for a baby under six months, I began contemplating what I could whip together.  Halloween has always been my favorite, and growing up I was fascinated with witches, playing the part of one myself several times.  I figured modifying the party hat pattern would be a simple solution!


Here is what you will need:


the essentials:

felt

witch's hat PDF 

a writing utensil (chalk works will for black felt)


1/16” elastic cord


hot glue or fabric glue


the possible pretties:


buttons


ribbon


rick rack


feathers


beads


tulle


bows


a little spider moss would be fun


whatever your heart desires!


Print and cut out the pattern templates.  Using a cardstock  or thicker paper will make them easier to work with.


Trace them onto the felt and cut out the shapes.


Shape the top of the hat like it’s a waffle cone.  You should have an overlap of about ½” at the base. 


Glue the hat together, leaving the end unglued so you have some room to tuck your trim under.
 
Glue the top of the hat to the brim, making sure the hat is centered.  Don’t worry about any visible glue, as you’ll be covering that seam up with ribbon.
 
Cut and glue ribbon around the seam, tucking the ends in at vertical seam, and gluing that area down.
 
Now you’ll want to embellish your hat.  I added some old buttons, a feather, and some tulle that I colored with a sharpie.  With two little ones, a quick trip to the craft store isn’t an option, so I made what I had work.


I did the same thing with the elastic.  I know you can buy elastic in many colors, but I’ve found that coloring it with a sharpie for various headbands has worked well.  If you’re worried about the strong odor, I just rinsed it in some soapy water afterward and after a few days the smell had dissipated.   I simply placed it around Milly’s head to see what length I needed. 


Place a drop of glue on in the center of the bottom of the hat and attach both ends of the elastic. 

 
Cut a circle out, smaller than the brim of the hat, and glue it over the elastic ends.
 
 
There you have it!  A cute little hat for your little one, or your big one, or maybe yourself as you hand out treats on All Hallows’ Eve.


Isn't that just the cutest lil smile you've ever seen!  She definitely looks like a good witch to me :)

Thanks so much Gwen for sharing your creative talent with us!

Happy Wednesday everyone,

Jenny

Sunday, October 21, 2012

Candy Corn Bag Tutorial


These little bags came to be after two ideas kind of collided.  When my brother, sister and I were little, my mom made each of us these darling little bunny appliqued drawstring bags to hold our jelly beans at Easter.  They really were one of her secret little tricks to try and get us to be quiet in church Easter morning...super sneaky mom. I had planned to tutorial those cute little bags in the the spring, but then conjured up the idea of a candy corn bag for Bryce to give favors to his buddies in. Since Bryce's favorite candy is candy corn ( how appropriate is that for an October baby ), these little gift bags started something that grew into the theme of his 6th birthday party.  They were, of course, filled with candy corn, and also a test tube of glow-in-the-dark green slime, and funny glasses.
 
On to how to make this quick easy little bag!  A great project for the any beginner...  
 
Materials:
-1/4 yard (or scraps will work too!) of white, orange, and yellow cotton fabric
- 24 inches of 3/8 inch matching ribbon
white thread
rotary  cutter
 
 
1.  First, You need about 1/4 of a yard of orange, yellow and white cotton fabric.  Kona is my favorite, it just washes and holds up really well. 
 
NOTE:  For my party I needed 13 bags, so I cut about 3 strips of 45" fabric to get 26 sides for 13 bags...agh! Math! You can get about 4 bags out of one strip of 45" fabric - please note in my pics my strips will look longer due to the number of bags I was making.
If you just want to make ONE bag your width will be 10 inches ( this will give you two pieces of roughly 5x6 inch sides).
 
Using a rotary blade cut 3 strips...the white will be 3 inches long x at least 10" wide , the yellow and orange 2 1/4 inches x 10 inches.


 2. Match the long edges (width) of your white and orange fabric together and pin. Sew 1/4 inch seam (see green line in photo).


3. I don't have a serger, so I went back and zig-zag stitched over my edge to reduce fraying. If you do have a serger, this step can be eliminated.


4.  Pin the yellow strip to the other side of the orange with a 1/4 inch seam and finish with zig-zag stitch.


5.  Press the seams down, so that the finished piece lays nice and flat.


6.  Measure a 5 inch width out of your strips and cut.  If you are making one bag, you now have two pieces that look like this.... 
If you are making multiple bags, cut 5 inch widths out of the entire strip.  This should give you about 7-8 bag faces (depending on the width of your fabric).


7.  Place the fronts together and pin.  I started stitching 1 inch down from the top left corner of your bag and continue down across the bottom and back up the other side, again, stopping 1 inch before you reach the top of the bag.  I back stitch at the start and the finish to reinforce the seams.  (please ignore the incorrect order of my fabrics on the photo below!  I forgot to photograph this step and had to use one of my goof ups!)


 8. Now, take your iron and on the front (it's still wrong-side out) fold the 1/4 inch seam in the top 1" of un-sewn fabric into the bag...see picture. Do this on the left and right side of the front. Then, flip over to the back of the bag and do the same thing.


9.  Picking up only the front facing of the bag, fold down 1/4 inch of white fabric and press.  Fold down another 1/2 inch and press again.  This will form your casing on the front of the bag.  Do the same on the back of the bag. 

 10.  Stitch (see green line in photo above) right along the edge of the casing. ( I turned my bag right-side out to complete this step)


11.  Cut a 12 inch length of 3/8 inch ribbon of your choice.  Attach a safety pin to one end of the ribbon and feed it through the casing, beginning and ending on the same side.  Take your second piece of 12 inch ribbon and on the opposite side, feed it through the casing in the same manner.


12. Singe the edges of your ribbon with a lit match...be careful!  If you get the match too close to the ribbon it will catch on fire!  I stand at the kitchen sink, in case of emergency, and get it just close enough that the edge of the ribbon seals...this will prevent fraying.  Tie a knot on both sides and you are done! 


Happy Halloween everyone!
I hope your little one enjoys their candy corn bag as much as my little ones do!


Jenny


Tuesday, June 26, 2012

KIDS PROJECT: Painter's Tape Canvas Tutorial


It's so hot here in Missouri!! And if you are like every other parent around here, you are probably thinking "Great! What are we going to do all cooped up tomorrow!?" This is a project that Brock and Bryce did last summer and loved. It kept them both completely intrigued for over an hour three days in a row! Yep, that's right; three days....I was amazed! Each day the boys added some painters tape and painted a new "layer" on top of the old painting which gives a very multi-dimensional effect to the final project.
    This is so easy! But first you need to gather a few supplies...

    Paint -I used acrylic Folk Art brand paint...any craft store will have it. Choose the location first where the finished masterpiece will hang and then coordinate the paint accordingly. I choose a wall in my kitchen where the walls are pale green. Therefore, I went mainly with green, tints and shades of green,  blue-green, and yellow. A little color wheel knowledge comes in handy here...in a nutshell if colors are neighbors on the wheel they "play nice together"...opposites on the color wheel don't.  Mix opposites together and your will get a pretty yucky color. So say you want orange and blue in your finished product...that's fine! I will explain later how to make that work...but to begin pick one main color and it's tints and shades ( shade's add black to the main color, tints add white). We even threw in come metallic paint just for fun and it gave a really cool effect!
    Canvases -You may choose one for each child, or if you have a really big area you may opt to grid several 12 x 12 canvases together to cover more space... lots of creative options here! You can usually pick up a canvas pretty reasonably at Michael's or Hobby Lobby...they go on sale frequently.
    Tape - Painter's tape or regular old masking tape will workgreat. Varying the width is always great too, but not necessary.


    DAY 1 - To begin, put paint out on a paper plate. As far as colors go, I would go with your main color and tints and shades of it. So in our case I put out green that coordinated with the walls, white, dark green, yellow, and cream. For the first layer just let them go to town painting! Wherever they want...only rule: nothing we can recognize. No hearts, stars, trees, letters, etc. Just mush the colors around and experience what happens with them. Use different materials - this part they will love! Try spreading the paint with an old gift card, one of my favorite techniques.Very grungy looking. Make sure you get the edges and then let it dry overnight.

    DAY 2 -For the second layer have each child place tape wherever they choose on their canvas. It's really ok for them to put it wherever they want! As far as color goes...I still stay with a similar pallet to layer one, just make 2 or three subtle changes for contrast. Now let them go! Paint away! Cover whatever...as much or as little as you want of Day 1's painting. Let canvas dry overnight.

    DAY 3 -same as day 2 - or skip to day 4 :)

    DAY 4 -Now it's time to add some complement colors - this would be the time to add those colors that don't "play nice together"...just put out that color and it's tints and shades...So in ours that's where you see the red...I kind of told them to try to just put this color in spots they felt were"special" so it wouldn't overpower.

    DAY 5 -This is the best part...carefully pull off all that tape and see the masterpiece underneath!

    You really could drag this out for as many days as you want...the more days you do it the more depth your painting will have! We actually only have 3 layers on ours and I think 2 more would have been great...but totally happy with how they turned out. More importantly, the boys were so proud and now have masterpieces in the kitchen!


    I would love to hear if you give it a try!  Stay cool tomorrow everyone!

    Jenny