Monday, November 5, 2012

Chicken Tortilla Soup...hello fall!

yummy...


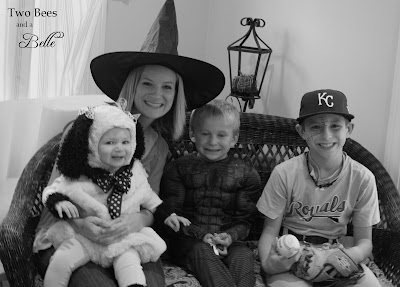
Phew! These past three weeks have been a whirl-wind! There has been costume making, birthday celebrating, trick-or-treating, Halloween parties and parades, baseball, soccer, open houses, school carnivals and more....makes me tired just thinking about it! I had been wanting to share pictures of Kate's Halloween costume. I made hers and my niece's from the same pattern and they turned out totally different and totally adorable! Kate was a pink poodle....we thought this was a good choice since one of her favorite phrases is "hi dog!". Julia was a sweet lil sheep...I will get pictures to share from her momma soon.

The witch, pink poodle, spiderman (minus the mask), and zombie baseball player
 
 And since it's a cold rainy day here in Missouri, I thought I would share one of my favorite fall soup recipes....


I made this soup for Bryce's Birthday party two weeks ago and it ended up being a great selection, because I threw it in the crock pot in the morning and it cooked all day, ready when the guests arrived!  Noooo prep...my kind of cookin!

You will need:
- 4 chicken breast halves (I use chicken tenders - they cook faster and I think are easier to cut!)
- 2 15 oz. cans of black beans, undrained
- 2 15 oz. cans of Rotel
-1 cup of salsa (mild, med. or hot)
4 oz can green chilies chopped and undrained
- 14 1/2 oz. can tomato sauce
- tortilla chips
- grated cheese
- sour cream (opt.)

First, combine all the ingredients (except the chips, cheese, and sour cream) in a large crock pot.
Next, cover and cook on Low 8 hours (or I have done 4 hours on high and it tastes great!).
Just before serving shread the chicken - because I really am just that lazy, I don't even remove it, I just kind of fish around and shread it in the pot, but I am sure a thorough person would remove it to do this :)
Ladle into individual bowls and top with crunched up chips, grated cheddar cheese, and I put a dollop of sour cream on top of mine....total comfort food!  Enjoy!

Jenny

Wednesday, October 24, 2012

Guest Post by Gwen Hefner: The Baby Witch Hat

Well do I have a treat for you today...I am so excited to be hosting our first guest poster!   Gwen Hefner, extremely talented and always creative, brings us a darling tutorial for a lil' Witch's Hat.  And wait until you see her little cutie! 

Halloween is a week from today!!  Do you have your costume ready??

And without further ado....I bring you, The Baby Witch Hat...


I want to thank Jenny for giving me the chance to do a guest post.  Sharing my DIY’s with others is something I’ve wanted to do for a long time, and I appreciate her giving me the chance to get my feet wet.
 

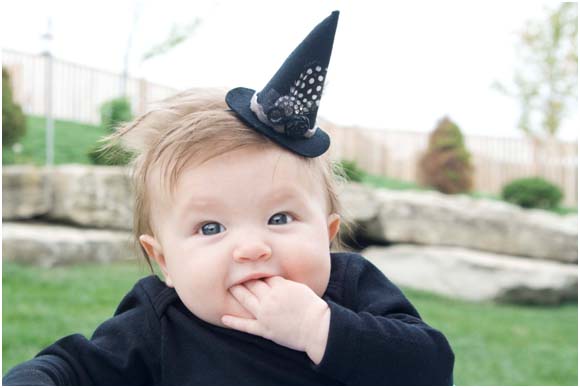
When my son turned 3 in September, he requested party hats and I knew I wanted to make something for my daughter, Milly, as well.  After sizing down the pattern I made for the bigger hats, I came up with this.
 

With Halloween fast approaching, and no luck finding a great costume for a baby under six months, I began contemplating what I could whip together.  Halloween has always been my favorite, and growing up I was fascinated with witches, playing the part of one myself several times.  I figured modifying the party hat pattern would be a simple solution!


Here is what you will need:


the essentials:

felt

witch's hat PDF 

a writing utensil (chalk works will for black felt)


1/16” elastic cord


hot glue or fabric glue


the possible pretties:


buttons


ribbon


rick rack


feathers


beads


tulle


bows


a little spider moss would be fun


whatever your heart desires!


Print and cut out the pattern templates.  Using a cardstock  or thicker paper will make them easier to work with.


Trace them onto the felt and cut out the shapes.


Shape the top of the hat like it’s a waffle cone.  You should have an overlap of about ½” at the base. 


Glue the hat together, leaving the end unglued so you have some room to tuck your trim under.
 
Glue the top of the hat to the brim, making sure the hat is centered.  Don’t worry about any visible glue, as you’ll be covering that seam up with ribbon.
 
Cut and glue ribbon around the seam, tucking the ends in at vertical seam, and gluing that area down.
 
Now you’ll want to embellish your hat.  I added some old buttons, a feather, and some tulle that I colored with a sharpie.  With two little ones, a quick trip to the craft store isn’t an option, so I made what I had work.


I did the same thing with the elastic.  I know you can buy elastic in many colors, but I’ve found that coloring it with a sharpie for various headbands has worked well.  If you’re worried about the strong odor, I just rinsed it in some soapy water afterward and after a few days the smell had dissipated.   I simply placed it around Milly’s head to see what length I needed. 


Place a drop of glue on in the center of the bottom of the hat and attach both ends of the elastic. 

 
Cut a circle out, smaller than the brim of the hat, and glue it over the elastic ends.
 
 
There you have it!  A cute little hat for your little one, or your big one, or maybe yourself as you hand out treats on All Hallows’ Eve.


Isn't that just the cutest lil smile you've ever seen!  She definitely looks like a good witch to me :)

Thanks so much Gwen for sharing your creative talent with us!

Happy Wednesday everyone,

Jenny

Sunday, October 21, 2012

Candy Corn Bag Tutorial


These little bags came to be after two ideas kind of collided.  When my brother, sister and I were little, my mom made each of us these darling little bunny appliqued drawstring bags to hold our jelly beans at Easter.  They really were one of her secret little tricks to try and get us to be quiet in church Easter morning...super sneaky mom. I had planned to tutorial those cute little bags in the the spring, but then conjured up the idea of a candy corn bag for Bryce to give favors to his buddies in. Since Bryce's favorite candy is candy corn ( how appropriate is that for an October baby ), these little gift bags started something that grew into the theme of his 6th birthday party.  They were, of course, filled with candy corn, and also a test tube of glow-in-the-dark green slime, and funny glasses.
 
On to how to make this quick easy little bag!  A great project for the any beginner...  
 
Materials:
-1/4 yard (or scraps will work too!) of white, orange, and yellow cotton fabric
- 24 inches of 3/8 inch matching ribbon
white thread
rotary  cutter
 
 
1.  First, You need about 1/4 of a yard of orange, yellow and white cotton fabric.  Kona is my favorite, it just washes and holds up really well. 
 
NOTE:  For my party I needed 13 bags, so I cut about 3 strips of 45" fabric to get 26 sides for 13 bags...agh! Math! You can get about 4 bags out of one strip of 45" fabric - please note in my pics my strips will look longer due to the number of bags I was making.
If you just want to make ONE bag your width will be 10 inches ( this will give you two pieces of roughly 5x6 inch sides).
 
Using a rotary blade cut 3 strips...the white will be 3 inches long x at least 10" wide , the yellow and orange 2 1/4 inches x 10 inches.


 2. Match the long edges (width) of your white and orange fabric together and pin. Sew 1/4 inch seam (see green line in photo).


3. I don't have a serger, so I went back and zig-zag stitched over my edge to reduce fraying. If you do have a serger, this step can be eliminated.


4.  Pin the yellow strip to the other side of the orange with a 1/4 inch seam and finish with zig-zag stitch.


5.  Press the seams down, so that the finished piece lays nice and flat.


6.  Measure a 5 inch width out of your strips and cut.  If you are making one bag, you now have two pieces that look like this.... 
If you are making multiple bags, cut 5 inch widths out of the entire strip.  This should give you about 7-8 bag faces (depending on the width of your fabric).


7.  Place the fronts together and pin.  I started stitching 1 inch down from the top left corner of your bag and continue down across the bottom and back up the other side, again, stopping 1 inch before you reach the top of the bag.  I back stitch at the start and the finish to reinforce the seams.  (please ignore the incorrect order of my fabrics on the photo below!  I forgot to photograph this step and had to use one of my goof ups!)


 8. Now, take your iron and on the front (it's still wrong-side out) fold the 1/4 inch seam in the top 1" of un-sewn fabric into the bag...see picture. Do this on the left and right side of the front. Then, flip over to the back of the bag and do the same thing.


9.  Picking up only the front facing of the bag, fold down 1/4 inch of white fabric and press.  Fold down another 1/2 inch and press again.  This will form your casing on the front of the bag.  Do the same on the back of the bag. 

 10.  Stitch (see green line in photo above) right along the edge of the casing. ( I turned my bag right-side out to complete this step)


11.  Cut a 12 inch length of 3/8 inch ribbon of your choice.  Attach a safety pin to one end of the ribbon and feed it through the casing, beginning and ending on the same side.  Take your second piece of 12 inch ribbon and on the opposite side, feed it through the casing in the same manner.


12. Singe the edges of your ribbon with a lit match...be careful!  If you get the match too close to the ribbon it will catch on fire!  I stand at the kitchen sink, in case of emergency, and get it just close enough that the edge of the ribbon seals...this will prevent fraying.  Tie a knot on both sides and you are done! 


Happy Halloween everyone!
I hope your little one enjoys their candy corn bag as much as my little ones do!


Jenny


Saturday, October 20, 2012

Happy Saturday!

Just popping in to wish everyone a great weekend!  I hope you all are enjoying this gorgeous weather!  I know we are.  The Johnson's are re-cooperating from a big birthday weekend as we celebrated Bryce's 6th Birthday yesterday.  The boys have been enjoying some beautiful bike rides on Bryce's new wheels!  What a big guy he is getting to be!
 
 
Stop back by tomorrow and I should have up a fun candy-corn bag tutorial ...just in time for those Halloween goodies!
 
Happy Saturday everyone....
 
Jenny

Friday, October 12, 2012

Birds of A Feather Flock Together


I had the fantastically fun opportunity this week to work on a little project for a good friend and neighbor of ours!  My friend Emily recently had a little girl, adorable Eleanor...such a cutie!  Eleanor was in need of a few last finishing touches to her already adorable nursery.  Emily "commissioned" me to do three murals for the nursery that went with her Pottery Barn Bedding.  Emily is awesome and gave me complete freedom to do whatever!  An artist dream!  I have done lots of murals in children's bedrooms, but this was my first "mini-mural" attempt...and let me just say I am completely head-over-heals for working on canvas instead!  I loooved being able to incorporate paint, fabrics, trims, texture, and scrapbook papers into these mini's. 

 Another talented friend had already designed some darling letters for her room and made a beautiful ribbon mobile (you can see her ETSY store here).   She was kind enough to let me use some of the same papers to tie everything together, but to keep it from being too matchy-matchy I added a few more.  I was really shooting to combine a very artistic, loose painting style with the very child-like "cut paper" feeling that the quilt provided.  I incorporated lots of blended paint areas to contrast with the cut paper collage elements.  And I am an absolute sucker for embellishment so of course rick-rack, glitter, and some iridescent paint were absolutely mandatory! 

We did two nature themed canvases, to compliment the bedding, and one with the folded paper fans.  I thought the folded paper fans would help add more texture to the theme and help break up the unity of having three pictures exactly the same.  A have a tutorial in the works for the fans when I show off a few more I made for Kate's room next week....stay tuned!

I can't wait to see how these three look living in their new home! 


Hope everyone has a safe and fantastic weekend!
 
Jenny

Wednesday, October 10, 2012

Believe

 
I have missed you!
Our computer has been away for almost two weeks getting fixed...it was very sick.  While it was gone I was just cringing thinking about what a great direction the blog was moving in and then to just go untouched for three weeks...well, I was worried!  To my surprise when I logged in last night and checked the site, wow!!!  We have had over 3,000 page views since starting in June.  I don't know if that's great or not, but to me, I think it's outstanding!  Just in the last month we have had visitors from the United States, United Kingdom, Russia, France, Canada, Germany, Malaysia, Ukraine, Australia, and Ireland. 
This. Amazes. Me.
I am completely humbled and thankful that there are folks out there seeing what we've been up to and checking in!  Thanks so much for sticking with us!
 
Which brings me to the first of many little projects that I have been working on the past few weeks...A good friend of ours who is the principal at an amazing little school in our community asked me if I would help her make some pillows for her school.  I was happy too!   The seven pillows were to spell the motivational word "Believe". 
 
I thought a lot about that word while I worked.  It seemed pretty appropriate too, since I have really been in "decision-mode" about things having to do with the Etsy store, and promoting it.  I just keep coming back to the word "Believe".  I think that is exactly what we have to do when we just aren't quite sure where to step next...close your eyes, stop worrying, and just BELIEVE!
 
 
Happy Wednesday!
 
Jenny


Monday, September 17, 2012

Brocade and Corduroy Jacket and Project Run and Play

 
And so begins Day #4 of being cooped up!  Last week Greg's car was in the shop and I was wheel-less at the beginning of the week, and by Thursday my car wouldn't start!  I was completely bummed, because Kate and I were on the way to go shopping, errrrr, I mean, to the Dr.'s office :) and my car wouldn't even get out of park!  Completely dead.  Turns out it's probably the alternator (which means absolutely nothing to me since I don't know a thing about cars).  No car again today, and probably tomorrow, sigh.  Soooo Kate and I have been logging a lot of hours the past two weeks at home.  Our big accomplishment last week, besides learning how to slide all by our self at the park, do tons of laundry and eat m&m's, was to whip up this little coat.  I had the corduroy in my fabric stash and I had bought the pink brocade that I used for the lining last week at Jo-Ann's on sale.  We added to the pattern a pink stretch velvet ribbon for a belt and the singed fabric flower.  For my first outerwear piece, I am pretty happy with it!  And of course, we needed a matching headband to complement of nearly hairless, except for about three very tight corkscrew curls, head.
 
 
As you can see, Kate was delighted with the photo op...insert the sound plllllllll with some spitting into the photo above....


 I also wanted to mention that I have been following a very cool blog called Project Run and Play.  If you are even semi-interested in sewing or kids clothes I think you would really enjoy this site!  The two girls that created it are sister-in-laws that basically designed a competition off of Project Runway, only their version is for kids.  They have done it for several season's and each new season pick various girls who blog and sew/craft to be featured.  Each week, the contestants sew up a full new ensemble for the public and a panel of judges to vote on.  Each week there is a winner and someone gets voted off.  In addition, blog followers may also "play along" to each week's theme and post a pick to a Flicker group showcasing your creation.  If any of you follow my blog, you may remember that I posted in their "Skirting the Issue" series.  Anyway, last week's theme was sewing an entire garment on the bias and wow, I was completely in awe of the creations!  I had really, really wanted to play along and just post to the flickr group, but with the  lack of car, didn't have my ducks in a row with the fabric I wanted to use.  This weeks theme is to design off of your favorite fashion icon.  I am really considering this one, both if I should try to enter, and who I would pick.  I love Grace Kelly, Audrey Hepburn, and the likes, but am curious....who is your favorite???

If you want to check it our for yourself the link to Project Run and Play can be found here.  I would love to know what you think!


Thursday, September 6, 2012

The Julia Bib Necklance and Headband

The Julia Bib and Headband are now available!   I ran across this pattern a week ago and it  immediately got bumped up to the "must make it NOW" pile. My niece Julia turned 6 months this week and her momma was looking for a cute photo prop for our new little sitter. When we took my daughters six month pictures I remember it being tough to figure out what to put her in because she had just started sitting up and wasn't doing to much. This little necklace is the perfect attention grabber for those little one pics!

I am really excited to whip one up for Mary Kate in golds and browns to wear this fall with a little corduroy/brocade jacket I am getting ready to make for her. What a dramatic statement! And I may be stashing one away for myself as well :) 

Julia's momma, my talented sister, Emily, took these beautiful pictures.  We are so lucky to have a photographer amongst us!  We have used Mary Kate's room for several photo shoots because the lighting is just perfect for these airy, soft photos.


Here are the details about our newest addition, available in the store today:

 This beautiful accessory will compliment any girls look. Used individually for little ones, the Julia Bib Necklace and Headband makes a lovely statement as a photo prop. Children, as well as adults, may dress up the neckline of any simple tank or dress with this bejeweled bib.

The Julia bib features silk, organza, and lace flowers, some singed, some sewn, all handmade. The center of each flower is finished with a bead, button, or rhinestone. Each embellishment is hand sewn and tied with strong floss to prevent removal. Each bib is finished on the back hiding all hand sewing and ties with satin or silk ribbon, making it completely adjustable to fit your little one.

Two Bib Sizes Available:
0-3 years: 5 1/2 inches wide x 3 1/4 inches tall (pictured above)
4-adult (a larger size with more flowers) 6 1/4 inches wide x 4 inch tall

Headband Sizes:
(headband is one flower with a button rhinestone on a satin front stretch elastic)
Newborn - 13 1/4"
3-6 Months - 14 1/2"
6-12 Months - 16"
12 Months-Teen - 17 1/2"
Adult - 18"

Example above is creams and pale pinks, but I can work with you to customize this creation.

Buttons and jewels may vary based upon availability. I accept keepsake treasures to incorporate into the design (ex. a grandma's brooch, handkerchief from a wedding, etc).  I used several buttons from our grandma's vintage button collection in the one pictured.

Each piece is a unique creation just for you; therefore it may slightly vary from pictured above.

Please just send me a message if you would like to purchase just the bib or just the headband and I will make a special listing for you. Bib alone is $30.00, headband alone is $10.00

Bib and headband combo: $38.00

pattern compliments of Violette Field Threads

Monday, September 3, 2012

The Pottery Barn Console Knock-Off

 
Happy Labor Day everybody!  Hope you have all had a nice relaxing end to your weekend!  I have one or two more house projects that I wanted to share with you. Our newly finished baseball room (aka: basement) has really been needing something for when we entertain to serve off of. I had seen this console in Pottery Barn a few years back and thought it would be perfect for our little room!   I stumbled across a blog several years ago: http://ana-white.com/, and was really motivated by her easy-to-follow directions to try a "build-it" project.  Sure enough, Ana had come up with a pattern for my console table, and seeing the savings and awesome finished product, I couldn't resist giving it a try ourselves.  I enlisted the help of my trusty sidekick, always up for a challenge with my hair-brain, creative ideas; the hubbers. After three weekend's of picking on this console table, we finally have it done!
 
After Greg and I finished our basement (almost all by ourselves) we are feeling quite capable these days of tackling "easy" building projects.  In this table we were introduced to a little tool called a Kreg Jig...and this is gonna sound really stupid, but I am in LOVE with this little thing!  It makes building things super simple and they look completely professional when finished.  It's not some big fancy tool, just a little vise that you drill into so that all of your screws enter boards on a slant.  Super-duper strong.  If your not into that sort of thing :), this all sounds like mumbo-jumbo, but the point is, anyone can do this project if you have a screwdriver, saw and Kreg Jig! ( and sadly no, I'm not getting an endorsement!)


We originally wanted to make the whole table from pallets.  That proved a little difficult in some parts, so in the end, the top and the sign were made from salvaged pallets.  I think we spent under $80.00 for all the wood and screws...Pottery Barns' original was something like 1100.00, but it has been discontinued so I had a little trouble finding the exact amount...either way, a massive savings.  The top is so cool with the old nails and staples just left in and stained over...exactly what we wanted for our baseball room.

But what to do with all those leftover pallet boards?  Really, poor Greg cut up like seven of them.  My hero.  That's were the sign idea came from.  I laid out the boards I wanted to use, then flipped them over.  Making sure I was using nails that wouldn't be two long, I laid two pallet boards perpendicular to the vertical boards, like a brace.  I put two nails into each board on each of the two braces.  It would have been really helpful if I had stopped and taken pics for you at this point, but I was in the creative groove.  The boards all nailed together, I was now ready to design the text.  I did a little Microsoft publisher magic, taped a big poster sized document together and s-l-o-w-l-y started transferring the letters.  This was really the hardest part.  They came out so light, even after repeated tracings.  Once finished, I hand painted the letters, adding shading where needed until it "popped".  (My middle school kids always made fun of me when I talked artsy like that to them...makes me smile thinking of it!)  Last, I outlined the "Johnson's" with sharpie marker...thank you Greg Johnson for that fantastic suggestion!  I am tickled pink with the final design!  Our baseball room is now really feeling like the boys dugout!

And just for the record, I still have like a million pallet boards sitting in my garage if anyone wants to come get some for your own sign, or you might be able to sweet talk me into making you one too. 

Have a great Tuesday everyone!  Thanks for stopping by!

Jenny